Need help ?Address: FLAT/RM 803 CHEVALIER HOUSE 45-51 CHATHAM ROAD SOUTH TSIM SHA TSUI KL
Email: support@hkmlc.com

A projector is a critical hardly ubiquitous tool that can play an essential role in modern classrooms and meeting rooms by transforming an HKMLC Smart Board into a QHD rectangular monitor that anyone can see more practical. No matter whether you use HDMI or VGA, it is worth checking that you have a perfect connection to get the best quality for your work. In this guide, we’ll be covering how to connect your HKMLC Smart Board to a projector, as well as how you can choose the best means to achieve this depending on your methods, therefore making connectivity between your HKMLC Smart Board & a projector an important but simple task.
Prior to connecting your HKMLC Smart Board, you need to make a choice between HDMI and VGA.
l HDMI (High-Definition Multimedia Interface): A single cable that can carry both high-definition video and audio. Designed more for modern projectors & displays
l Video Graphics Array (VGA): Transmits only video signals. However, if using a VGA connection you'll need an additional audio cable to send sound. Ideal for older projectors.
⮞ Does your HKMLC Smart Board need a quality connection? Our recommendation here is HDMI cables!

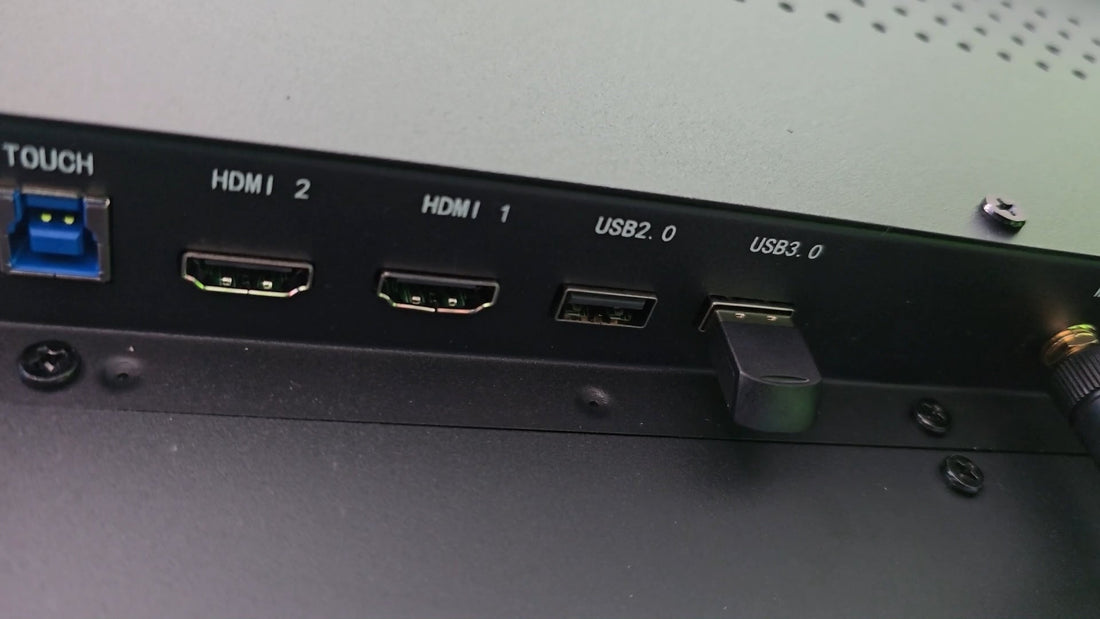
Check if the HKMLC Smart Board and the projector have the required HDMI or VGA ports. If the projector supports VGA and the Smart Board has HDMI, then you will require a HDMI to VGA converter.
l If your TV has an HDMI input, that will provide the best image (and sound) quality.
l An HDMI cable with a separate audio cable, if your projector does not support HDMI.
Disconnecting cables can disrupt signals or damage hardware, so be sure to turn off both the Smart Board and the projector first.
l Simply connect the HDMI or VGA cable to the port located on weather HKMLC Smart Board.
l Plug the other end of the cable into the projector’s input port.
l If using VGA, connect an audio cable from the Smart Board audio out to projector speaker input.
Turn on the projector and select HDMI or VGA (depending on which connection you’re using) through the input/source menu.
Set up the projector, turn the HKMLC Smart Board on and wait for it to detect the projector.
l And if the resolution is not matching, you can go to Smart Board settings and take the resolution of projector screen accordingly.
l Ensure the proper configuration of your audio settings (VGA)
Fix Your Smart Board Display Settings! Explore our user guide here!
No signal detected? Inspect cords to ensure they are connected appropriately and that the right input source is selected.
Gosip display layak ukel? Configure the Smart Board resolution to the native resolution of the projector.
No sound when using VGA? Ensure an audio cable is plugged firmly in place and the proper sound output is selected.
Still experiencing issues? Solutions for Troubleshooting get them here!
One of the cheapest settings is to attach your HKMLC Smart Board to the Projectors via HDMI or VGA. But you should choose a suitable connection to ensure clear video and matched audio as well to provide an interactive experience.
Accessories That Take Your HKMLC Smart Board Setup to The Next Level (Shop optimized cables, adapters here…)
No comments
Where Visions Are Amplified!
Email: support@hkmlc.com
Phone: 1-877-947-8577
Adress: ROOM_1, 16/F EMPRESS PLAZA 17-19 CHATHAM ROAD SOUTH, TSIM SHA TSUI, HK


0 comments