Need help ?Address: FLAT/RM 803 CHEVALIER HOUSE 45-51 CHATHAM ROAD SOUTH TSIM SHA TSUI KL
Email: support@hkmlc.com

As far as things go you'll want to make sure that your HKMLC Smart Board is mounted securely, after all it's not just the safety of your device that matters but having a stable and functioning display setup. However, if you have bought an HKMLC Smart Board and want to install it in your classroom or office space, mentioned below are few important safety considerations that ensure successful installation: Learn all of the steps that are required for the smart board wall mount process to be performed properly, so that there is little to no risk for damage and that each element in the process is completed quickly and efficiently.
Make sure you know if your wall is suitable to Mount a HKMLC Smart Board before you start the installation. Make sure that it will be able to handle the weight of the board. To install a smart board, you should check that your wall is either made of solid concrete or reinforced in order to properly install the smart board mounting bracket. If you'd like to learn more about the best type of wall to use, please feel free to check out our installation guide for the HKMLC Smart Boards!
Confirming the wall load capacity is probably the most critical step when mounting your HKMLC Smart Board. The screen weight and other components must be supported by the smart board bracket. You can usually find this in the product manual or specs sheet. If you’re still uncertain about the weight capacity of your wall, seek expertise from a pro for advice. For a tighter solution with heavy duty installation, please check HKMLC product page for smart board bracket.
Use high-quality heavy-duty anchors and brackets for your smart board wall mount. Poor material quality can cause instability and even accidents. Also, ensure that the wall mount bracket is compatible with the specifications of your HKMLC brand smart board, to prevent any fitting issues. This ensures all the equipment you need to secure your installation gets to you in the same package.
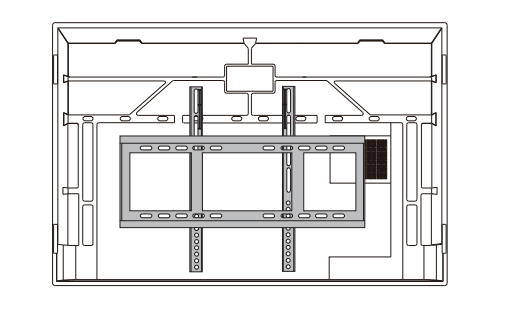
Credit: Courtesy of VIKING MOUNT SDN.
When the HKMLC Smart Board is ready, align it properly to the mounting bracket. This step is critical to ensure the board is elevated to the appropriate height and angle for easy viewing. You will want to enlist a second person to help with the alignment to make sure the device is properly centered. You are then welcome to follow our installation manual step by step to correctly align the board if you are inexperienced.
Once the area is prepared, attach the smart board bracket to the wall using the appropriate tools. All screws and bolts should be tight, and the mounting bracket should be flush with the wall. Make sure nothing is loose and smart board stays rock solid. You will need to follow the recommended torque specs, to avoid over tightening and potentially harming the board.
Now that the wall mount is fully secured, take the HKMLC Smart Board and gently slide it onto the bracket. *Handle with care, also do not damage the board! Reattach the smart board with any internal locking mechanisms or screws as described in your installation kit. Refer to MKMLC's smart board page for specific installation kit details.
Lastly, check that your board is stable by gently pushing down on the board or moving it. You want that not to move when you touch it.” This test is critical because it confirms that the mount is secure and protects the device.
Once fitted, give the cables time to bunch together. Having these organized looks, no one would be able to mess with your USB cables accidentally, No one would just pull it out on a whim. No tripping hazards — check all your connections — HDMI, USB, etc. — are secure.
If you find any issues with the smart board wall mount, such as unsteady or loose connections, you must go through each point again to ensure that every component has been installed correctly. If there is an ongoing issue, you can schedule a session with our support desk or follow our instructions for fixing it.
This means scrolling through the output, listing it, etc. to be sure that your HKMLC Smart Board is positively wall mounted and working to maximise performance. However, you can always install them the right way so you have a safe, practical, and organized space while using quality materials.
If you would like to find more tips or how to choose the right smart board mounting bracket for you check out our product page. The last thing you want to do is find the right equipment and tools to ensure your smart board is securely mounted for years to come.
No comments
Where Visions Are Amplified!
Email: support@hkmlc.com
Phone: 1-877-947-8577
Adress: ROOM_1, 16/F EMPRESS PLAZA 17-19 CHATHAM ROAD SOUTH, TSIM SHA TSUI, HK


0 comments