Need help ?Address: FLAT/RM 803 CHEVALIER HOUSE 45-51 CHATHAM ROAD SOUTH TSIM SHA TSUI KL
Email: support@hkmlc.com

So if you think a 32-in wall tablet is cool, beat the HKMLC interactive Smartboard, a Sleek multi-functional interactive display that might just be the centerpiece of your smart home or office. This thing is loaded with features that'll take collaboration and entertainment to a whole new level.
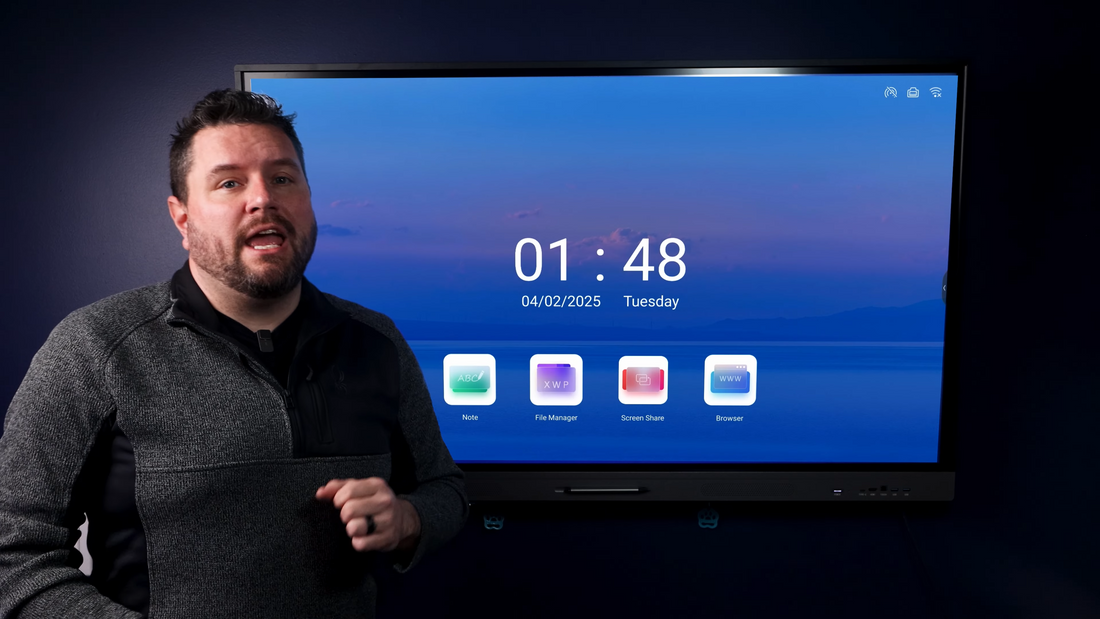
Hey there, neighbors. I'm Ryan, The Tech Guy, and welcome back to this smart house. Today we're going to be looking at the 55 inches essential Smartboard by HKMLC. This Advanced Digital whiteboard is designed for classrooms, offices, and anyone who needs to find a collaborative or interactive solution. Today, we're going to cover the installation setup features and pricing to help you understand if something like this is the right fit for your space. Now, to get started, let's unpack the massive list of features, starting with the display.

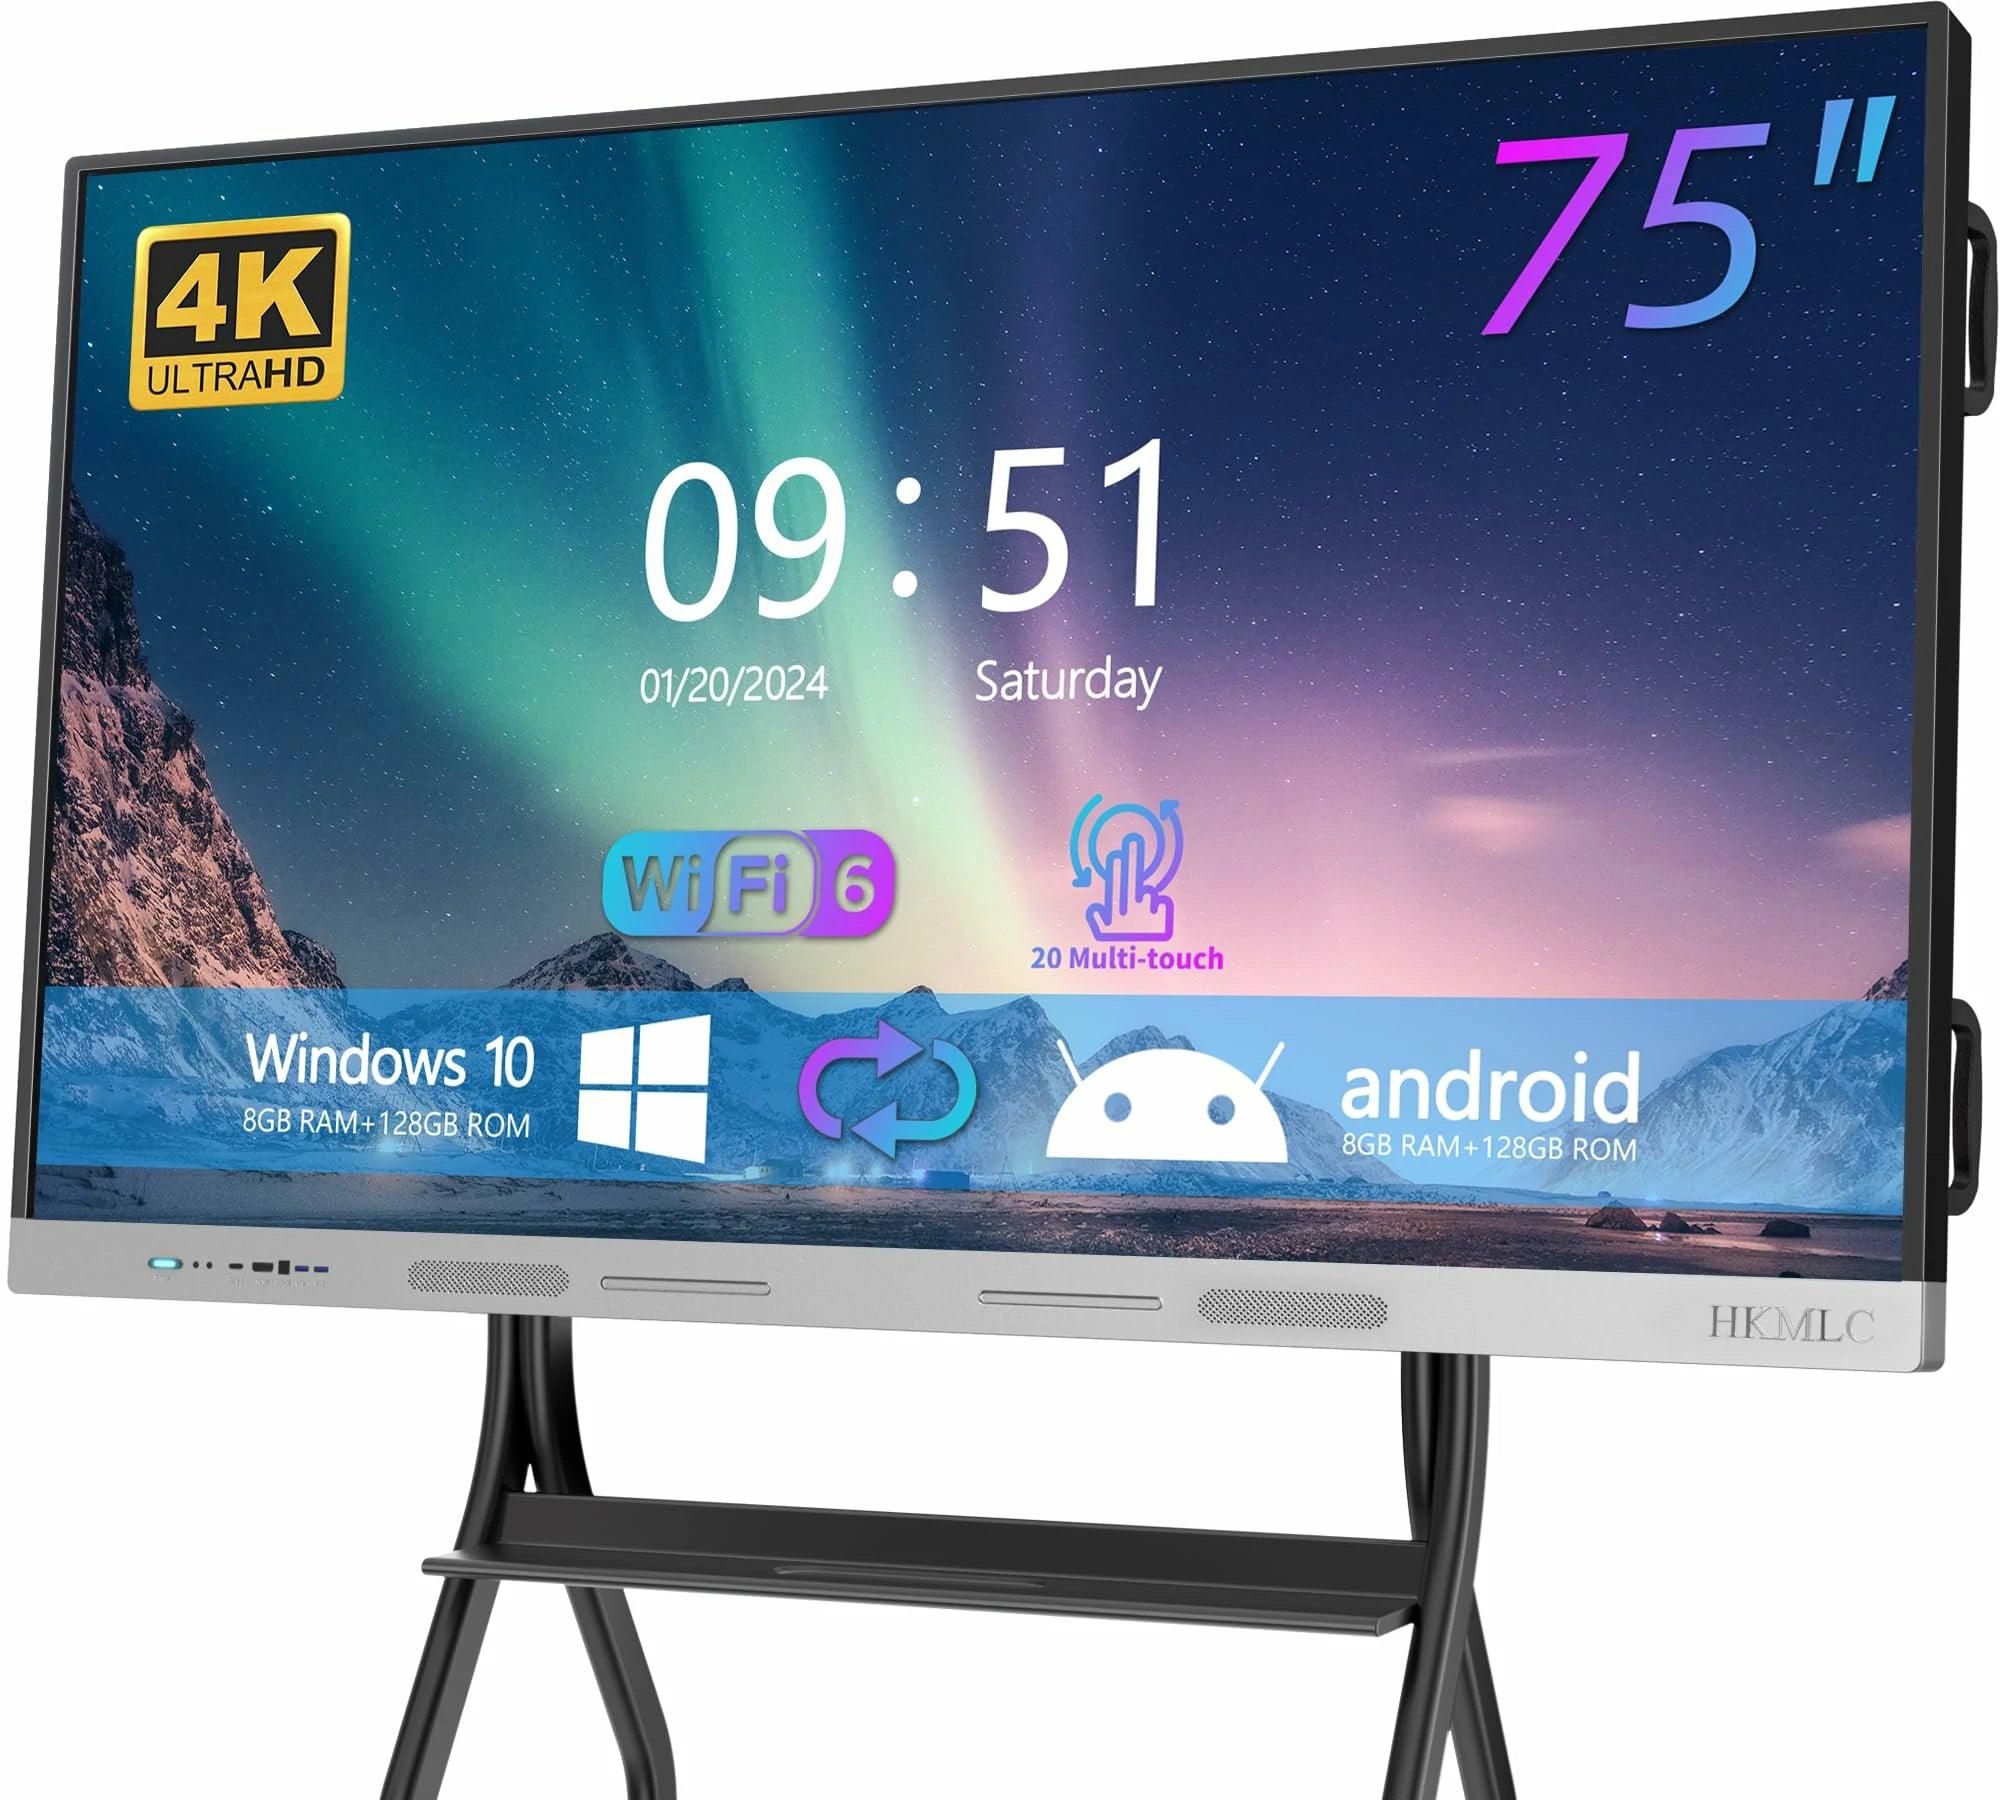
This Smartboard features a 55in 4K UHD display that'll deliver sharp-resolution visuals perfect for presentations, teaching, or collaborative work. Now, this does feature a matte screen cover with a wide viewing angle, so you'll be able to see this pretty much from anywhere in an office or classroom setup. Now, what sets us apart from almost any other TV is the touchscreen and the included styluses. This touchscreen supports up to 20 individual touchpoints, which are powered by an infrared Touch system around the outside edge. This means multiple users can interact with the display all at once again, making this quite ideal for a classroom or a collaborative meeting. It also comes with two of these double-ended styluses. This way, you can actually annotate and draw over anything that you display on the screen.

Now, under the hood, this board is powered by a Cortex A55 processor, and because this is the base model, it comes with four gigs of RAM and a 32 GB SSD. This should be plenty of horsepower if you're only really going to be using this as a Smartboard; however, you might have some issues running more intensive apps, but it also runs on Android 11. This means not only do you get all the built-in apps, but you also have access to the Play Store, meaning just like the Killa I talked about last year, you get full control, and it can install almost any Android app on it.

Now, for sound down at the bottom, you've got two 15-watt speakers, which will provide clear audio for video calls, lessons, presentations, or for just watching TV. It also supports Wi-Fi 6 for fast and stable internet connection, and I assume there is a second Wi-Fi card on board so it can support hotspot mode, meaning that you can have a guest connect directly to the board without having to connect from your existing Wi-Fi and while it's camera ready keep in mind it doesn't actually include a camera you'll have to add one on if you actually need that functionality. I'm currently testing various cameras to see which ones will work with the board.
Now, when it comes to Ports, you will not be short on any connectivity options. It includes three HDMI ports two on the back and one in the front. It also has a VGA input for those old-school users, plus an RS 232 connector for legacy connections. I need to explore this a little bit further cuz I think it'll give me some control over the system. There's also a gigabit Ethernet port for Wired networking, which I've got connected to right now. Multiple USB ports, including USB 2.0, USB 3.0, and USB connectors on the front and back for touch functionality, which we'll talk about here in a minute. You've also got on the side a mic input, a headphone out, and an optical out for external audio setups. There's also included a standard infrared remote for control. Now, this board does come in multiple Hardware variants, allowing you to choose what best fits your needs. And if wal counting isn't an option for you, they do have a rolling card option for flexibility and moving it into different spaces, and if you're concerned the flickering you see here on the screen is just an artifact of the camera you actually don't have any flickering it's a smooth display I haven't had any issues with it so far.

Now, installing Smartboard is pretty straightforward, and all the necessary accessories are included in the box. Now, this version does include a basic wall mount. If you're not reusing an existing TV mount, then you'll need to go out and find standard instructions for finding a stud and mounting a TV mount to the wall. Make sure you do this securely because this is a heavier display, but for my installation, I'm replacing my existing 55-inch TV that's been up here for quite a while, so I just went ahead and used the existing Mount to speed everything up.
So the first thing you're going to want to do is carefully unbox the screen you probably will need more than one person as it does weigh over 50 lbs. Now, I put some towels down on the surface that I was using to set this up, so that would be a good idea to lean it against a wall. That way, you can get access to the back. You'll need to then install the wall mount bracket portion on the back of the display using the included screws. Now, this is a Visa 400x400, so it's one of the larger mounts. You're going to need the large bolts that are included in the kit, and of course, if you don't already have a mount on the wall, you'll need to go ahead and install that following your standard instructions. Now, while you have access to the back of the display, I would recommend going ahead and installing all four of the Wi-Fi antennas that are included in the Box. Just make sure you bend them so they're out of the way. Then again, you're probably going to need two people to lift the display up onto the wall and secure it using the mount. Now, one nice thing about this display is they actually have power connections on the side, so once you get it mounted to the wall, you can plug in the power after the fact and then flip the switch on to turn on the display. Then, you want to go ahead and connect it to Wi-Fi or ethernet for full functionality.
Now just like every other tablet in the world this display doesn't actually turn off normally you can just press the power button to cycle the screen on and off so it comes back on almost instantly once you press the button.

Next up, let's talk about what most users are going to be using this for, and that's to share content, so whether it's videos, pictures, or collaborating on documents or drawings, this display can pretty much do all of that. The real power of having an interactive Smartboard like this is the ability to not only display any input but also annotate it and share it with others. So, to bring in external content, you have several options. So, of course, this being a display, you're going to want to have some flexibility on what content you can show on it. In addition to all the features of the Android operating system, you can also bring in content using any of the inputs that are included. Starting with the four HDMI inputs, you can connect a computer video device or any other source via the HDMI ports. You've also got a USB port, which can be used in combination with the HDMI. This way, you can connect a computer via HDMI and a USB plug so that way, you can use the screen's touchscreen to control your computer. This works for both Windows and Mac.
There's also a handy USBC connection here on the front which means that you can use this to transmit both display and touch input information with a single cable. This not only works with computers but also tablets and phones. Now, it does work okay on my iPad, but I have some issues with the display resolution, so the touch doesn't exactly line up. Now, there is also a whole host of wireless display options, including AirPlay for your iOS and Mac OS users. You can share content wirelessly from an iPhone, iPad, or Mac using the included IM mirror app. Now, if you're a Windows or Android User, you have the option of using the built-in Wireless sharing in the share app that's also included on the device. Now, this is the basic version. You can upgrade to a pro version if you want, but that's not required to do the basic screen sharing, and they also offer third-party USB wireless adapters that allow you to plug directly into a computer and instantly share your screen with the display.
So, for any of these input options, including the built-in Android display, you can take a screenshot, annotate it, and store it either on board or share it with anybody you want. It does have built-in support for most major Cloud providers, but of course, you can install any Android app you want if you have a specialty one that you want to share with. So for example over here I actually have my Legion go connected in through the HDMI port so if I go over here and I bring up the menu click on the options icon here it's going to bring up the quick settings where I can change it to HDMI 2 which is already on so if I go over here and wake up my if I wake up my Legion go I can actually remove the controllers from it connect it into the 3D printed holder that I have and game on it like I would any other display this is a handy little feature that allows you to play double duty but if I wanted to I could take any bit of content click over here and bring up click the pencil icon then it's going to take a screenshot and I can annotate over anything that I want highlight things so in this way you can bring in input that you'd like and actually display it on the screen and then Mark it up and then when you're done you can hit save and it's going to save that into your onboard storage which then you can share out to any cloud provider that you want the same holds true when you're in Android mode you can also bring up the markup screen and then select anything you want mark it up and save it.

Now, over here to the left-hand side, this is your primary toolbar. You've got your standard back home and app switch button in most Android applications, which you can go in here and close by pressing the X that'll kill any application that's currently running in the background, or you can switch to it. You've got some presets here. They'll take you to the note application to your file manager or bring up the additional apps, and these are every app that I've already got installed on the system itself. Then, below that, we have quick access to annotation, which will take a screenshot and let you annotate anything that's available. You've got quick options to get to your settings, which allows you to change input, adjust the brightness of the screen your volume, or flip over to your advanced settings, which allow you to tweak a lot of the different display settings, including changing the color temperature and then at the bottom we have access to our toolbar which is a bunch of really nice little utilities that are built in including a timer a stopwatch the screen recorder which I'm using right now this is a great option if you make content the only problem is the screen recording is capped at 1080p it can't record at 4K which for most users that'll be more than enough you have the ability to freeze the screen so you can make your annotation you can crop so if you wanted to crop in and take a screenshot of just a specific section you can do that here and then, of course, you can once you're done you can mark it up because it's going to import it in. You can do a split screen which lets you put two applications on the screen at once so if you have a Samsung phone you might be used to this or even split screen that's in on an iPad you can activate the camera if you happen to have a camera installed you can set up a quick pole which allow people to use a QR code to vote either anonymously or you can have them put their name in and then you can bring up a voting result which is pretty neat you can set up fast fire file transfer which will use that additional Wi-Fi card to make a quick file transfer you have a quick calendar you can bring up you can activate the touch overlay which puts this little icon in the bottom corner which allows you to turn on and off the touch screen so you can disable interactivity if you want to or reactivate it so this is nice if you're a person who wants to touch the screen you can turn that off if you need to and finally screen lock which is going to lock the screen this allows you to lock the screen like on any other Android device and have to require a PIN to unlock it.

So, one of the most powerful features of this screen is the note-taking app. This allows you to have either a collaborative note-taking session or a whiteboard session and be able to store and interact with the screen all at once. So along the bottom here is our toolbar and you can see I've got the screen recording going right now so along the bottom we've got our menu where we can bring up for different options to create new save as import export store cloud or change the theme this allows me to bring in things like handwriting lines a grid music Sports diagrams kind of whatever you want or you can change the color of the background if you want to be in a light or a dark mode then at the bottom here we have the option to select something existing that we've already drawn and we've got the pin mode which this allows us to customize both the front and the back of the pen so we can see here it's currently got the front of the pen set to a pencil type I can make it black and then I can make the back of it a brush a broad brush in yellow that means when I draw with the front it's a pencil when I draw off the back it's a marker now I have noticed if you're off angle at all like I'm left-handed so when I'm off angle sometimes it confuses the tip for the back so if you do run to that problem either set them the same or write more straight onward I'm standing to the side so it's a little awkward. Then you have the Eraser function on here, which you can either erase with your finger or you can use the pin. If that's selected, then there's a clean all button which will just clear the screen off a ruler, which is a nice touch so you can bring up a real ruler and actually have it scale one to one with what's on the screen this is great for technical drawings you also have the option of bringing up other rulers like angles or even a protractor so that's pretty neat.
One neat feature is the partition function, which allows you to split the screen into multiple sections. This is great for an interactive classroom. Each user can have a different color, so if I'm over here, it's this color. If I'm over here, it's green; I'm over here, it's blue, and if you're marking from one side, it won't allow you to move into somebody else's space, so again, that's pretty great for a classroom setup especially then we've got some protein shapes so you can draw in even 3D objects if you wanted to you can insert a table of different sizes, and then hand write inside of them if you wanted to. One of the coolest features that I think I'm going to use a lot of is the Mind map feature which will actually preload a quick mind map and it allows you to write inside and have your handwriting recognition so my handwriting is terrible most things can't recognize my handwriting if I were to write in a standard case then most likely be able to detect my handwriting but you don't even need to worry about that if you just want to use your own handwriting you can just write something in the box and not have it recognize and then move on to another box here and then you can actually go in and add in more boxes move them around which is Handy with a select tool so if you have use a select tool then you don't have to worry about it accidentally writing while you're selecting something so we use a selection tool we can click on any object and then modify it including handwriting so if I write something here I click the select tool I can select it and it gives me some options like smart writing it which will try to convert it into a letter I can change the color I can search for it flip it move it up or down clone it and delete it which is one of the great advantages of having a digital whiteboard you also have the ability to bring up sticky notes so you can write a quick note to yourself or type something in here using the onscreen keyboard and then that'll stick over to the side and then you got the preview function which allows you to zoom in and out and see everything that's currently on your screen and of course you can put in these little grid notes in here move them around and then write something on here if you need needed to have some lines and if you need to make more pages you can just hit the add button and and then it'll give you a blank page and you can move back and forth using the options at the bottom right hand corner of course this being a digital canvas you have the ability to undo and redo which is super helpful when you end up making a mistake and once you're done with everything you can click on menu and Export it save it or you can use the share function which is actually going to export it to their cloud service so that way you can just scan the QR code on the screen and view it from your phone or mobile device.

Now that we have covered the majority of the features and screen-sharing capabilities, you might be wondering what the heck you might use something like this for, so let's talk about some real-world applications for the Smartboard. The primary reason that I wanted to get this Smartboard was to make educational content like these videos, so this is great for making educational content or explainer videos using the built-in whiteboard and notes app, which allows you to illustrate complex ideas in real-time. You can use the input capture to bring in external content and annotate them in a step-by-step explanation, and using the built-in screen recording functionality lets you create those explainer's videos easily using just the display itself. Plus, you can load up almost anything that can be run on an Android tablet or even your screen, Mark it up, and send it on your way, which would be great for things like drawings or any sort of complicated diagrams.
Another great use would be for homeschooling or homework help. Now I've got three kids, and all of them are used to using smartboards in school, so they absolutely love having the options to go in here and access all the resources that they have at the school right here at our house you can utilize the built-in web browser to gain access to things like schooly to look up assignments for kids and submit them right from the display plus because this is running Android you can install many different Educational Tools like Google Classroom Con Academy or even dual lingo to assist with learning at home at your kids Pace.
Now of course another great usage would be in an office environment I know the guys at work would kill to have something like this this would be great for using for a built-in web conferencing display setting up Zoom meet or teams and because most of the applications let you share an Android screen you can mark up in whiteboard with those across the country or the world it's also great for marking up office documents and PDFs using the buil-in Office application meaning you can quickly retrieve a document mark it up and send it out to whoever you want all from the screen and if you really need to get into more detail using something like a cad application you can use either the USBC input or the HDMI with touch sharing this lets you connect a laptop or computer and fully control it using the touchscreen on the board and of course for me I'm going to be using it as a ridiculously over-the-top smart home tablet so I've got the home assistant app already installed on the device meaning I can control my whole home from this touchscreen but also be able to control certain aspects of the touchscreen from home assistant I can install a number of my other smart home apps like yui or Google home and manage everything from this large touchscreen.
Now, let's come to the all-important topic of pricing. Now, the version that I'm reviewing here is a 55 inches the essential model, which comes in at $1,699, and this is the base model in HK LMC's lineup. There are two additional upgraded options that are available: the elite, which is $1,799. This version runs Android 12 and has eight gigs of RAM and 128 GB of storage for better performance and more app support, or you can go to the 55 inches Vision, which is $1,899. This upgrades the processor from the essentials and includes a 48-megapixel camera for video conferencing and remote collaboration.
Now while that price seems quite a bit more expensive than most your TVs got to remember that this is a full-fledged Android tablet and Smartboard allinone and if you compare this to other smartboards that are out on the market this is a fairly competitive price many of the known Brands out there have similar siiz smartboards that range anywhere from $2,500 up to 5,000 plus often requiring additional purchases for software and accessories so if you are in the market for something like this the HKMLC Smartboard does offer strong value with a great combination of features expandability and built-in tools that don't require expensive add-ons so if you were comparing this to a TV of course this is going to be considerably more expensive and for something like a small office like mine it makes no sense but if you are doing homeschooling providing additional education in your home creating content or you want to use this in an office environment it really gives you a lot of flexibility for for a pretty small price point.
Now, I will say there are a couple of things that I've run into, one of which is that it's a little slow because of that low amount of RAM, and again, this is the entry-level version, so if you are going to be doing a lot of interactive applications using the Android you might want to look at stepping up to the faster processor. I've also noticed in Android mode, the colors look a little bit more washed out than I would expect. I'm not sure if this is just a symptom of the screen itself, but it does look better when you bring in an outside input using HDMI or something else; of course, for most folks, you're looking for the interactive capability, you're not going to use this in a movie room.
No comments
Where Visions Are Amplified!
Email: support@hkmlc.com
Phone: 1-877-947-8577
Adress: ROOM_1, 16/F EMPRESS PLAZA 17-19 CHATHAM ROAD SOUTH, TSIM SHA TSUI, HK


0 comments