Need help ?Address: FLAT/RM 803 CHEVALIER HOUSE 45-51 CHATHAM ROAD SOUTH TSIM SHA TSUI KL
Email: support@hkmlc.com

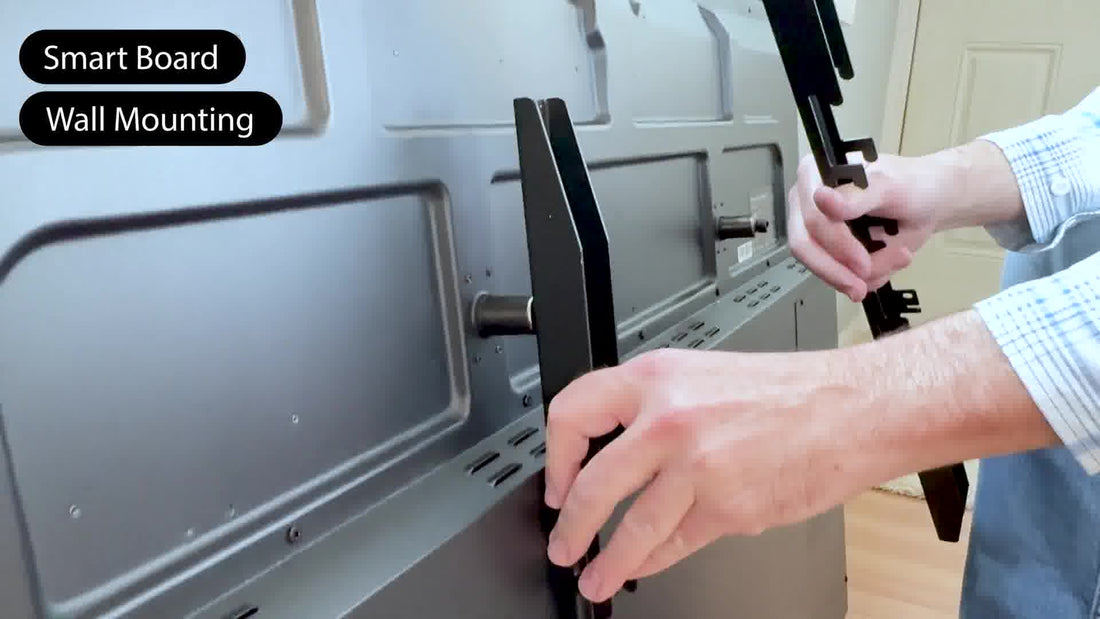
All About HKMLC Smart Board Wall Mounting. Wall mounting also clears floor space, lends a tidy professional appearance to your environment, ensures the board is set at the ideal height for comfortable viewing and use. In this guide, we are going to take you through the full process of how to securely mount your HKMLC Smart Board on your wall or whatever surface you have decided on.
Once you have the necessary tools ready, you can go ahead on preparing the place for installation. For safer principles, always place your safety first whenever you work on any mounting devices. Make sure the area where you are installing is clear and put on safety gear like gloves and protective eye wear, so you don’t injure yourself. Ensure the wall can support the weight of the smart board and its mounting bracket.

Tools Required: These are the tools you will need to mount the HKMLC Smart Board:
· Smart board mounting bracket
· Drill with appropriate bits
· Level tool
· Screwdriver
· Included with the bracket: screws and anchors
· Measuring tape
· Pencil or marker for marking
These tools will enable a both accurate and secure installation. If it is necessary to order a smart board mounting bracket click here examine HKMLC product page.

The first step in the mounting process is to choose the right location. The wall should be enough to support the weight of the smart board, and without obstacles. The best practice is to mount the board at eye level so that most body types (shorter and taller) can easily reach the board. Also ensure that the location is conveniently located to power outlets and any other devices that you will be connecting to the smart board.
Use a level tool to keep your markings even once you've selected the correct wall space. Identify where to mount the brackets. Get this one right so that smart board is firmly mounted and aligned. These marks will show you where to drill holes for the mounting bracket.

Drill holes with the correct size drill bit to match the type of wall (drywall, brick, etc.) at the marked points. Bore Holes Make sure to bore deep enough holes to fit the screws and anchors that come with the smart board mounting bracket. This will help make sure the mounting bracket will attach to the wall securely.

Again, attach the mounting bracket on the wall, with screws and anchors. Ensure that the bracket is absolutely level before tightening all the screws. The HKMLC Smart Board can be rather heavy, so make sure the bracket is steady and locked in place.

The bracket is firmly attached, it is time to secure the HKMLC Smart Board. Make sure you carefully lift the smart board and hang it on the mounting bracket. The board may click in place once it’s aligned correctly, depending on the model. Ensure that it is properly pressed in before proceeding.

The next step is powering the board up, which should be considered after mounting the board. Power Connect the smart board to a wall socket plus any external components such as a laptop, audio system or microphones. If you have other devices that need to be connected, ensure that all cables are well placed so they do not interfere with the board's operation.
Turn on the HKMLC Smart Board after connecting all devices to ensure it is working. Once the installation is complete, you can test the touch functionality, clarity of the display, and connectivity. For now, this is for best performance, adjust if needed
Lastly, adjust the position of the smart board (if needed). If the board is not perfectly aligned or feels loose, double-check your mounting bracket and tighten screws if necessary. When your smart board is mounted securely and 100% functional, you can start using your smart board.
Check out the HKMLC product link for more from a trusted mount for your smart board that is built to last!
No comments
Where Visions Are Amplified!
Email: support@hkmlc.com
Phone: 1-877-947-8577
Adress: ROOM_1, 16/F EMPRESS PLAZA 17-19 CHATHAM ROAD SOUTH, TSIM SHA TSUI, HK


0 comments